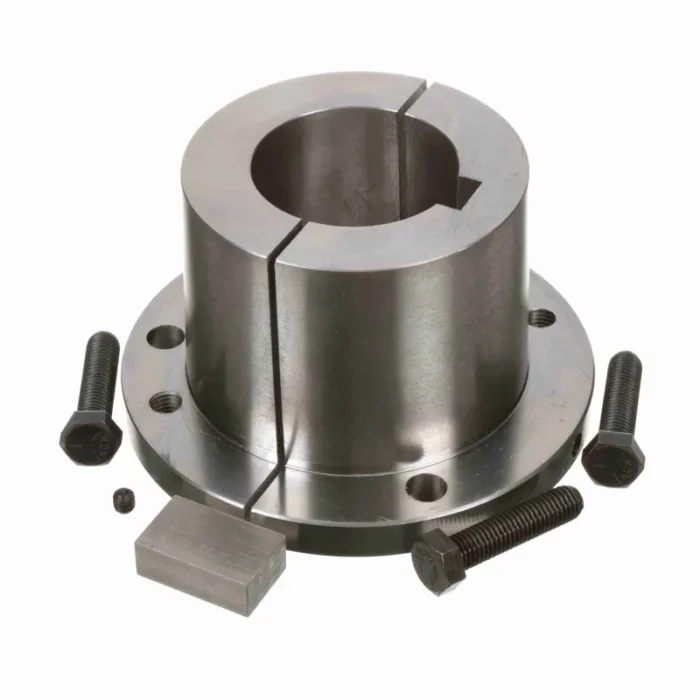
U0 Type Split Taper Bushings
U0 Type Split Taper Bushings are mechanical components designed to facilitate the secure and precise mounting of power transmission products such as sprockets, pulleys, and sheaves onto shafts. These bushings are split along their length and feature a taper that allows them to provide a strong clamping force when installed. Made from durable materials like steel or cast iron, U0 bushings are engineered for high torque applications and reliable performance in various industries, including manufacturing, agriculture, and automotive sectors.
U0 Type Split Taper Bushings are mechanical components designed to facilitate the secure and precise mounting of power transmission products such as sprockets, pulleys, and sheaves onto shafts. These bushings are split along their length and feature a taper that allows them to provide a strong clamping force when installed. Made from durable materials like steel or cast iron, U0 bushings are engineered for high torque applications and reliable performance in various industries, including manufacturing, agriculture, and automotive sectors.
The "split" design allows for easy installation and removal, even in tight spaces, while minimizing shaft wear. The taper ensures a tight, concentric fit, reducing vibration and misalignment, which helps improve operational efficiency and prolong equipment lifespan. U0 bushings are typically secured using bolts that draw the bushing into the hub, locking it firmly onto the shaft. They are also versatile, as they come in various bore sizes to fit different shaft diameters. This flexibility, combined with their robust construction and ease of use, makes U0 Type Split Taper Bushings a popular choice for power transmission systems.

U0 Split Taper Bushing Dimensions
 | 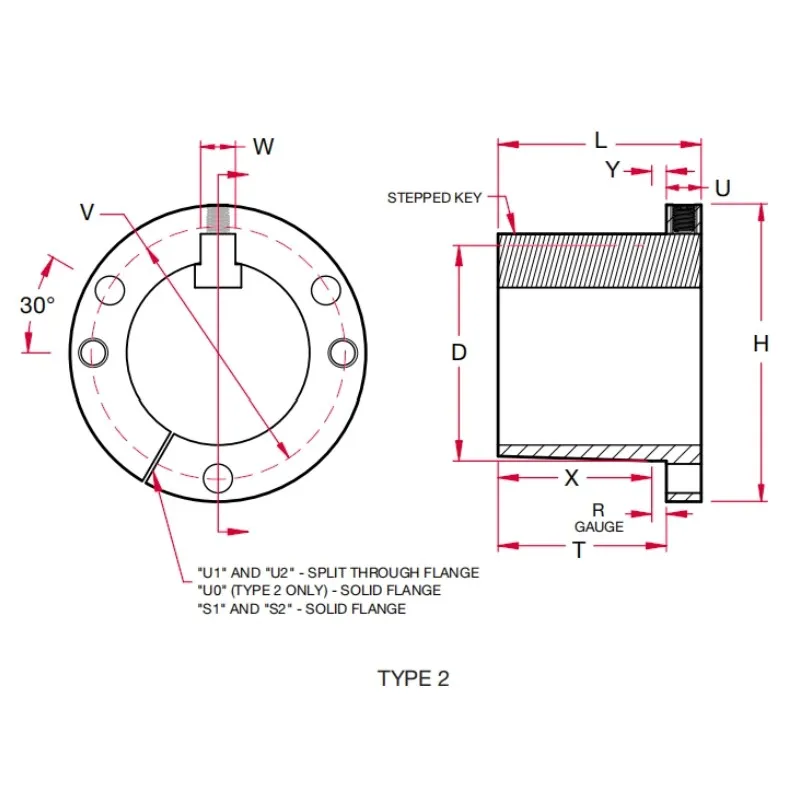 |
| Bushing Type: | U0 | |
| Dimensions(in): | L | 5-1/4 |
| U | 1-1/16 | |
| T | 4-3/16 | |
| D Large End | 6 | |
| D Small End | 5.766 | |
| H | 8-3/8 | |
| W | 1-1/4 | |
| X | 3-3/4 | |
| Y | 7/16 | |
| R | 7/16 | |
| Bolt Circle (V): | 7 | |
| Stock Bore Range(in): | Type1(Min.) | 2-3/8 |
| Type1(Max.) | 3-1/16 | |
| Type2(Min.) | - | |
| Type2(Max.) | - | |
| Cap Screws: | # of Screws | 3 |
| Thread Dia.(in) | 5/8 | |
| Length(in) | 2-3/4 | |
| Wrench Torque(in-lbs): | 1680 | |
| Ave.weight(lbs): | 30 | |
Key Features of U0 Type Split Taper Bushings
U0 type split taper bushings have several key features that make them a reliable choice for mounting components like pulleys, sprockets, or sheaves onto shafts. Here are the key features:
- Double Split Barrel Design: The U0 split taper bushing features a double split barrel, which enhances concentricity with the shaft. This design allows for a tighter grip and reduces vibration, ensuring smooth operation and precise alignment in high-torque applications, improving overall system efficiency and component longevity.
- Solid Flange for Stability: Equipped with a solid flange, the U0 bushing maintains a concentric bore, minimizing wobble during operation. This robust flange design supports heavy loads and high-speed applications, providing a secure connection that enhances the durability and performance of mounted components.
- Key-to-Key Drive System: The U0 bushing incorporates a key-to-key drive, utilizing keys on both the shaft and the bushing. This setup delivers a strong, positive drive, capable of transmitting high torque without slippage, ideal for demanding industrial applications requiring reliable power transfer.
- Self-Locking 3/4" Taper: Featuring a 3/4" per foot taper on the barrel, the U0 split taper bushing offers a self-locking mechanism. This taper ensures a secure, mechanical lock between the bushing and component, eliminating the need for additional locking devices and simplifying installation.
- Durable Material Construction: Typically made from sintered steel or cast iron, U0 split taper bushings are built for durability. These materials withstand harsh environments, resist wear, and handle high loads, ensuring long service life and reducing maintenance costs in industrial settings.
- Easy Installation and Removal: The split design of the U0 bushing allows for straightforward installation and removal without requiring extensive disassembly of surrounding components. This feature saves time during maintenance, reduces downtime, and facilitates quick adjustments or replacements in operational settings.
U0 Type Split Taper Bushing Installation Steps
- Clean Components Thoroughly: Before installation, clean the bushing, hub, and shaft to remove dirt, grease, or rust. Use a degreaser or solvent and a clean cloth. This ensures a secure fit, prevents slippage, and avoids misalignment during operation, which could lead to premature wear or failure.
- Inspect Bushing and Hub: Examine the U0 split taper bushing and hub for any damage, such as cracks, burrs, or deformities. Verify that the bore and keyway dimensions match the shaft and component specifications. Proper inspection ensures compatibility and prevents issues during assembly or operation.
- Align Bushing in Hub: Insert the bushing into the hub, aligning the split taper with the hub’s bore. Ensure the bushing seats evenly without forcing it. Proper alignment prevents binding, reduces vibration, and ensures efficient power transmission during operation.
- Position on Shaft: Slide the assembled bushing and hub onto the shaft, aligning the keyway with the shaft’s key. Position the assembly at the desired location. Accurate positioning is critical for proper equipment function and to avoid misalignment or operational inefficiencies.
- Insert Key in Keyway: Place the key into the aligned keyway between the shaft and bushing. Ensure the key fits snugly without gaps. A properly fitted key prevents rotational slippage, ensuring reliable torque transmission and maintaining component alignment under load.
- Tighten Set Screws Gradually: Using a torque wrench, tighten the set screws in a star pattern to the manufacturer’s specified torque. Gradually increase torque to ensure even pressure. This prevents distortion, ensures a secure grip, and maintains alignment during operation.
- Check Alignment and Fit: After tightening, verify the bushing and hub are properly seated and aligned. Check for any wobble or misalignment. Correct alignment ensures smooth operation, reduces wear, and extends the lifespan of the bushing and connected components.
- Perform Final Torque Check: Re-torque the set screws after initial operation (about 10-15 minutes) to ensure they remain secure. Vibration or settling may loosen them. This step confirms a reliable connection, preventing unexpected slippage or equipment failure during use.
Additional information
| Edited by | Yjx |
|---|