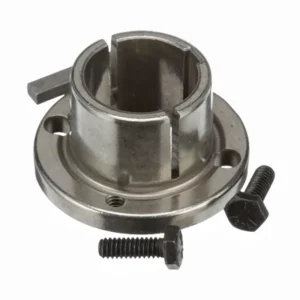
Split Taper Bushings
Split taper bushings are meticulously engineered for durability and strength, offering unparalleled reliability in a variety of applications such as chain sprockets, v belt sheaves, v belt pulleys, gears, and more—all of which we offer. What distinguishes our split taper bushings is their premium-grade steel construction, combined with precise manufacturing and rigorous quality control measures. This ensures that each product consistently meets the highest standards of quality.
Split Taper Bushing Dimensions

G and H Split Bushing

G and H Split Bushing

P, B, Q, and R Split Bushing

P, B, Q, and R Split Bushing

S and U Split Bushing

S and U Split Bushing

W and Y Split Bushing

W and Y Split Bushing
| Bushing Type | Dimensions(in) | Bolt Circle (V) | Cap Screws | |||||||||||
|---|---|---|---|---|---|---|---|---|---|---|---|---|---|---|
| L | U | T | D | H | W | X | Y | R | # of Screws | Thread Dia. (in) | Length (in) | |||
| Large End | Small End | |||||||||||||
| G | 1 | 1/4 | 3/4 | 1.172 | 1.133 | 2 | – | 5/8 | 3/16 | 1/8 | 1-9/16 | 2 | 1/4 | 5/8 |
| H | 1-1/4 | 1/4 | 1 | 1.625 | 1.570 | 2-1/2 | – | 7/8 | 3/16 | 1/8 | 2 | 2 | 1/4 | 3/4 |
| P1 | 1-15/16 | 13/32 | 1-17/32 | 1.938 | 1.856 | 3 | 3/8 | 1-5/16 | 7/32 | 7/32 | 2-7/16 | 3 | 5/16 | 1 |
| P2 | 2-15/16 | 13/32 | 2-17/32 | 1.938 | 1.793 | 3 | 3/8 | 2-5/16 | 7/32 | 7/32 | 2-7/16 | 3 | 5/16 | 1 |
| P3 | 4-7/16 | 13/32 | 4-1/32 | 1.938 | 1.699 | 3 | 3/8 | 3-13/16 | 7/32 | 7/32 | 2-7/16 | 3 | 5/16 | 1 |
| B | 1-15/16 | 1/2 | 1-7/16 | 2.625 | 2.557 | 3-11/32 | 1/2 | 1-3/16 | 7/32 | 1/4 | 3-1/8 | 3 | 5/16 | 1-1/4 |
| Q1 | 2-1/2 | 17/32 | 1-31/32 | 2.875 | 2.766 | 4-1/8 | 1/2 | 1-3/4 | 7/32 | 7/32 | 3-3/8 | 3 | 3/8 | 1-1/4 |
| Q2 | 3-1/2 | 17/32 | 2-31/32 | 2.875 | 2.703 | 41/8 | 1/2 | 2-3/4 | 7/32 | 7/32 | 3-3/8 | 3 | 3/8 | 1-1/4 |
| Q3 | 5 | 17/32 | 4-15/32 | 2.875 | 2.609 | 4-1/8 | 1/2 | 4-1/4 | 7/32 | 7/32 | 3-3/8 | 3 | 3/8 | 1-1/4 |
| R1 | 2-7/8 | 5/8 | 2-1/4 | 4.000 | 3.875 | 5-3/8 | 3/4 | 2 | 1/4 | 1/4 | 4-5/8 | 3 | 3/8 | 1-3/4 |
| R2 | 4-7/8 | 5/8 | 4-1/4 | 4.000 | 3.750 | 5-3/8 | 3/4 | 4 | 1/4 | 1/4 | 4-5/8 | 3 | 3/8 | 1-3/4 |
| S1 | 4-3/8 | 3/4 | 3-5/8 | 4.625 | 4.418 | 6-3/8 | 3/4 | 3-5/16 | 5/16 | 5/16 | 5-3/8 | 3 | 1/2 | 2-1/4 |
| S2 | 6-3/4 | 3/4 | 6 | 4.625 | 4.27 | 6-3/8 | 3/4 | 5-11/16 | 5/16 | 5/16 | 5-3/8 | 3 | 1/2 | 2-1/4 |
| U0 | 5-1/4 | 1-1/16 | 4-3/16 | 6 | 5.766 | 8-3/8 | 1-1/4 | 3-3/4 | 7/16 | 7/16 | 7 | 3 | 5/8 | 2-3/4 |
| U0 | 4-15/16 | 3/4 | 4-3/16 | 6.000 | 5.766 | 8-3/8 | 1-1/4 | 3-3/4 | 7/16 | 7/16 | 7 | 3 | 5/8 | 2-3/4 |
| U1 | 7-1/8 | 1-1/16 | 6-1/16 | 6 | 5.649 | 8-3/8 | 1-1/4 | 5-5/8 | 7/16 | 7/16 | 7 | 3 | 5/8 | 2-3/4 |
| U2 | 10-1/8 | 1-1/16 | 9-1/16 | 6 | 5.461 | 8-3/8 | 1-1/4 | 8-5/8 | 7/16 | 7/16 | 7 | 3 | 5/8 | 2-3/4 |
| W1 | 8-1/4 | 1-7/16 | 6-13/16 | 8.5 | 8.102 | 12-1/2 | 1-1/4 | 6-3/8 | 7/16 | 7/16 | 10 | 4 | 3/4 | 3 |
| W2 | 11-1/4 | 1-7/16 | 9-13/16 | 8.5 | 7.914 | 12-1/2 | 1-1/4 | 9-3/8 | 7/16 | 7/16 | 10 | 4 | 3/4 | 3 |
| Y0 | 11-1/8 | 2 | 9-1/8 | 12 | 11.469 | 16-1/2 | 2 | 8-1/2 | 5/8 | 5/8 | 14-1/2 | 4 | 1 | 5 |

What are the Split Taper Bushings?
Split taper bushings are mechanical components used for mounting pulleys, sprockets, and other devices onto shafts. Unlike solid bushings, split taper bushings have a split design, allowing for easy installation and removal. They feature a tapered surface that matches the taper on the hub of the mounted component. This taper facilitates a tight and secure fit when the bushing is tightened onto the shaft. Split bushings are commonly used in power transmission applications, providing a convenient and efficient means of connecting rotating elements to shafts while simplifying assembly and disassembly processes. Split taper bushings are widely used in industrial applications like conveyors, fans, and pumps due to their versatility, reliability, and ability to accommodate various shaft sizes.
Whether you need more information or a quote for large quantities, don’t hesitate to reach out. We’re here to assist you every step of the way.
Key Benefits of Split Taper Bushings
- Easy Installation and Removal: Split taper bushings simplify mounting and dismounting on shafts. Their split design allows quick attachment without requiring extensive disassembly, reducing downtime and labor costs in industrial applications.
- Secure and Precise Fit: The tapered design ensures a tight, concentric grip on the shaft, minimizing slippage and vibration. This precision enhances component alignment, improving overall system efficiency and performance.
- Versatility Across Applications: These bushings accommodate various shaft sizes and components, such as pulleys or sprockets. Their adaptability makes them ideal for diverse industries, including manufacturing, agriculture, and automotive systems.
- Enhanced Shaft Protection: By distributing clamping forces evenly, split taper bushings reduce shaft wear and damage. This prolongs the lifespan of both the shaft and the mounted components, lowering maintenance costs.
- Cost-Effective Maintenance: The reusable design allows bushings to be replaced or adjusted without discarding other components. This modularity reduces replacement costs and supports efficient maintenance in high-wear environments.
- Improved Torque Transmission: The robust clamping mechanism ensures reliable torque transfer between the shaft and mounted parts, enhancing system stability and preventing power loss during operation in demanding conditions.


Applications of Split Taper Bushings
Split taper bushings are critical components in various industries, used to mount sprockets, pulleys, gears, and sheaves onto shafts for efficient power transmission. Here are key industries where split taper bushings are applied:
(1) Manufacturing: In manufacturing, split taper bushings secure pulleys and sprockets in conveyor systems and machinery, ensuring precise power transmission. Their split design allows easy installation and removal, reducing downtime during maintenance and accommodating shaft size variations for seamless operation.
(2) Automotive: Automotive applications use split taper bushings to mount timing pulleys and gears in engines and transmission systems. They provide a secure connection, preventing slippage and ensuring synchronized motion critical for vehicle performance and reliability under high loads.
(3) Material Handling: In material handling, split taper bushings are used in conveyor belts and rollers, ensuring smooth operation. Their robust design handles heavy loads, minimizes misalignment, and simplifies maintenance, enhancing efficiency in warehouses and distribution centers.
(4) Agriculture: Agricultural machinery like tractors and harvesters rely on split taper bushings to connect sprockets and pulleys. They withstand harsh conditions, ensure reliable power transfer, and allow quick adjustments, supporting continuous operation during critical planting and harvesting seasons.
(5) Robotics: In robotics, split taper bushings mount timing pulleys for precise, synchronized motion in automated systems. Their secure grip prevents slippage, ensuring accuracy in high-speed, repetitive tasks, and their design supports easy reconfiguration for flexible robotic applications.
(6) Pumps and Compressors: Split taper bushings are used in pumps and compressors to connect rotating elements to shafts. They provide a stable, vibration-resistant connection, ensuring efficient operation, reducing wear, and allowing easy maintenance in industrial fluid and gas systems.
(7) Packaging Machinery: In packaging, split taper bushings secure pulleys and gears in high-speed equipment like fillers and sealers. Their reliable hold ensures consistent performance, minimizes downtime for repairs, and supports precise timing critical for automated packaging lines.
(8) Mining: In mining, split taper bushings secure pulleys and sprockets in heavy-duty conveyors and crushers. Their robust design withstands extreme conditions, ensures reliable power transmission, and simplifies maintenance, reducing downtime in rugged environments.
(9) Construction: Construction equipment like mixers and cranes use split taper bushings to mount rotating components. They provide a strong, adjustable connection, accommodating varying shaft sizes and ensuring consistent performance under high loads and vibrations.

Manufacturing Industry

Automotive Industry

Material Handling

Agriculture Industry

Pumps and Compressors

Mining and Construction
Split Taper Bushing Install and Remove
Split Taper Bushing Installation Steps:
- Clean all components thoroughly: Before installation, clean the bushing, hub, and shaft to remove dirt, grease, or debris. This ensures proper fit and prevents slippage or misalignment during operation, enhancing the assembly’s longevity and performance.
- Inspect parts for damage: Examine the bushing, hub, and shaft for dents, burrs, or wear. Damaged components can compromise the fit, leading to vibration or failure. Replace any defective parts to ensure a secure connection.
- Align bushing in hub: Place the split taper bushing into the hub, aligning the tapered surfaces. Ensure the bushing sits evenly without forcing it, as misalignment can cause uneven stress and potential failure during operation.
- Insert screws loosely: Thread the cap screws into the bushing’s holes, but do not tighten them yet. Loose screws allow for adjustments during shaft insertion, ensuring proper alignment and preventing damage to the threads or bushing.
- Slide assembly onto shaft: Carefully slide the bushing and hub assembly onto the cleaned shaft, positioning it at the desired location. Avoid forcing the assembly, as this could damage the shaft or bushing and affect performance.
- Tighten screws incrementally: Tighten the cap screws gradually in a star pattern to evenly draw the bushing into the hub. This ensures uniform pressure, preventing distortion and maintaining alignment for optimal torque transmission.
- Check alignment and torque: Verify the assembly is properly aligned using a straightedge or dial indicator. Tighten screws to the manufacturer’s specified torque, ensuring a secure fit without over-stressing the bushing or hub.
- Perform final inspection: After tightening, inspect the assembly for gaps, misalignment, or looseness. Confirm the hub rotates smoothly without wobbling, ensuring reliable operation and reducing the risk of premature wear or failure.

Split Taper Bushing Remove Steps:
1. Clean the Work Area: Thoroughly clean the bushing, shaft, and surrounding components to remove dirt, grease, or debris that could interfere with the removal process. Use a degreaser or solvent and a clean rag to ensure a clear view of the bushing and its fasteners, making it easier to access screws and inspect for damage.
2. Locate and Loosen Set Screws: Identify the set screws or cap screws securing the bushing to the shaft, typically two or three, depending on the bushing size. Using the correct size hex wrench or socket, loosen these screws by turning them counterclockwise, but do not remove them completely at this stage to maintain control.
3. Insert Removal Screws: Locate the threaded holes in the bushing, often adjacent to the set screw holes, designed for removal. Insert appropriately sized removal screws (usually provided with the bushing) into these holes. Gradually tighten each screw in a star pattern to evenly apply pressure and begin separating the bushing from the hub.
4. Apply Penetrating Lubricant: Spray a penetrating lubricant, such as WD-40 or PB Blaster, into the gap between the bushing and the hub or shaft to loosen any rust or corrosion. Allow the lubricant to sit for 5-10 minutes to penetrate, which helps reduce friction and makes the bushing easier to dislodge during removal.


5. Tighten Removal Screws Alternately: Continue tightening the removal screws in a star pattern, turning each screw a quarter to half turn at a time. This gradual, even pressure pushes the bushing out of the hub or off the shaft. Work slowly to avoid binding or damaging the bushing, checking alignment as you proceed.
6. Tap the Bushing if Necessary: If the bushing resists movement, gently tap it with a soft-faced mallet or a hammer and a brass drift to help break it free. Focus light taps around the bushing’s outer edge, avoiding excessive force that could deform the bushing or damage the shaft or hub.
7. Remove the Bushing: Once the bushing is sufficiently loosened, slide it off the shaft by hand. If it’s still tight, continue alternating between tightening the removal screws and tapping until it’s fully disengaged. Inspect the bushing and shaft for wear, corrosion, or damage that may need addressing before reinstallation.
Split Taper Bushing FAQ
How Does a Split Taper Bushing Work?
What Are Split Taper Bushings Used For?
What Materials Are Split Taper Bushings Made From?
What Sizes Are Available for Split Taper Bushings?
What Maintenance Do Split Taper Bushings Require?
Why Choose Split Taper over Other Bushings?
High Quality Split Taper Bushing for Sale
-

G Type Split Taper Bushings
-

H Type Split Taper Bushings
-

P1 Type Split Taper Bushings
-

P2 Type Split Taper Bushings
-

P3 Type Split Taper Bushings
-

B Type Split Taper Bushings
-

Q1 Type Split Taper Bushings
-

Q2 Type Split Taper Bushings
-

Q3 Type Split Taper Bushings
-

R1 Type Split Taper Bushings
-
R2 Type Split Taper Bushings
-

S1 Type Split Taper Bushings
-
S2 Type Split Taper Bushings
-

U0 Type Split Taper Bushings
-
U0 Type Split Taper Bushings
-

U1 Type Split Taper Bushings
-

U2 Type Split Taper Bushings
-

W1 Type Split Taper Bushings
-

W2 Type Split Taper Bushings
-

Y0 Type Split Taper Bushings